Welcome! The following is a basic system planning calculator that I have developed to determine basic energy requirements you may need in the event of a power outage. You will need Microsoft Excel to view the spreadsheet.
System Planning Calculator
Instructions for using the system planning calculator:
- Modify any of the grey shaded boxes (device name, power value etc..)
- Estimate the continuous wattage for each device you plan to use. You can use the item’s specification sheet or use a device like the Kill A Watt Electricity Usage Monitor
. Simply plug the device into the kill-a-watt meter and plug the meter into an outlet to read the wattage.
- Estimate the time (in hours) that you plan to use that device. For items like the refrigerator, I took an educated guess and figured it would run about half of the time with normal use – it might be a little more or less.
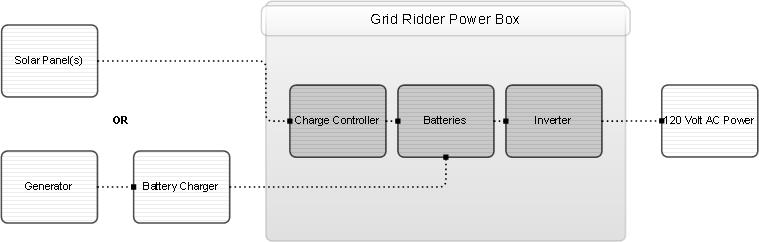
- On the right hand side of the page, enter the device(s) or appliance(s) that use the most watts to determine the generator size you need. For me, I figured on running 1 or 2 big ticket items at one time (like an oven and washing machine) and running the 60 amp battery charger. This maximizes the use of your generator run time and cut gasoline consumption from 24 hours/day to 8 hours a day – a huge improvement.
- Next, enter the specs for the type of battery you would like to use (many articles on the pros and cons of 6volt vs. 12volt vs. 24volt systems. I went with a 12 volt system and battery bank). The specs are usually written right on top of the battery. I used 4-12 volt deep cycle marine batteries from Walmart. They are solid performers, available everywhere, and if you pick them up at the store, you save major $ on shipping costs.
- The inverter specifications are automatically generated based on the estimate of your maximum continuous energy requirements. For example, if you only plan to run a 1000 watt hair dryer and a 200 watt light bulb continuously and nothing else, you would want an inverter that could handle 1200 watts continuous (1000+200) and 2400 watts surge (rule of thumb double the continuous capacity) Based on my requirements, I chose a 2000 watt pure sine inverter with a 4000 watt surge.
- For days without sunshine, I utilize the battery charger (it plugs right into the generator) to recharge the whole system in about 4 hours (twice daily). The spreadsheet calculated that I need a 53 amp charger (pretty hefty). I have a sears wheeled starter/charger that I use (100/60/20 amp) which does the job nicely.
- If you want to add the option of solar recharging for the battery bank, enter the power specifications for the solar panel(s) you are considering. (Remember: more watts and/or more panels = quicker recharging time but, higher cost $). The spreadsheet will generate the hours of sunshine needed for a complete recharge of the system based on the energy you used. The specs for the maximum input to my solar charge controller top out at 1240 watts and I my solar panels are rated at 270 watts each so….because I have 4 panels attached to my system (1080 watts), if I wanted to add more panels, I would probably need to purchase a larger charge controller. (Bigger is better if you can afford it!)
- The items on the spreadsheet that are highlighted in green can be used as your “shopping list” for the next step which is BUY HARDWARE. In that tab, Links are provided for the components I use (or would use now in the case of discontinued or upgraded items like my battery charger). Within the “Buy Hardware” tab, there are 4 sections: Amazon Parts, Home Depot Parts, Walmart Parts, and Grid Ridder Parts that you can purchase directly through gridridder.com (such as the MC4 ADAPTER PLUG or the CODE BLUE BATTERY SAVER). I created the MC4 adapter because I wanted to be able to use any extension cord with most solar panels on the market (I think most use MC4 connectors) and connect them to my system. I created the battery saver to use as a bi-yearly conditioner. This device uses high voltage pulses to de-sulfate batteries and bring them closer to their original state. It will keep your new batteries in top condition and extend their lifetime significantly.
- After you buy your components, go to step 3 which is BUILD SYSTEM to access the FREE assembly instructions. After entering a valid email address, you can download and print the .pdf file with step by step instructions and photos. I find that asking for a valid email address keeps spammers to a minimum and creates a link between you and I in the event that you have specific questions that I might be able to answer directly. Thanks!